Saturday, February 27, 2010

Week 8: No Knead Pizza Crust


Friday night has lately been pizza night around here, which is just fine with me - pizza, even made from scratch, is easy, and everyone likes it. Win-win on a Friday night!

But plain cheese pizza (which the kids prefer) gets boring. And I wanted to try a new kind of pizza crust, using a no-knead dough. Now, making pizza dough isn't exactly a hardship for me, thanks to my shiny KitchenAid Mixer, but no knead dough sounded interesting, and it's supposed to give a better texture.

The main issue with no knead dough is that you have to start it really far in advance - it needs to rise for at least 12, preferable more like 24 hours. So when I'm making dinner on Thursday night I through together the dough and let it sit on the counter until Friday afternoon.

I forgot to take the first photo, but this is what the dough looks like after about 24 hours:

It's very, very, VERY soft and sticky. When you peel it out of the bowl, you have to cover your hands very well with flour, and it'll still probably stick!

dough turned out:

Stretched out on the pizza stone:

I find this dough both easy to work with, in that it stretches nicely, and immensely difficult, in that it's so sticky!

I like to pre bake the dough for about 15 minutes so I get a nice crispy crust, then add the toppings and just heat until they are warm.

So the kids got the plain cheese pizza, but for me I got a bit fancy, with caramelized onions, roasted garlic, sundried tomatoes, olive oil, black olives, feta and bacon. Yum!


No Knead pizza crust (makes two pizzas):

3 cups all-purpose or bread flour, more for dusting
¼ teaspoon yeast
1½ teaspoons salt
1½ cups warm water

Stir together; I usually knead it one or two times just to make sure it's well mixed. Cover with plastic wrap and let sit in a warm, draft-free place for 12 to 24 hours.

Turn out onto a well-floured surface and shape into two rough balls. Cover with a clean tea towel and let sit for about 2 hours.

Stretch or roll out the dough. I like to pre-bake the crusts in a very hot oven (450 or so) for 10-15 minutes, then top, and return to the oven for about 5 minutes. let sit for 5 minutes, slice, and enjoy!

Friday, February 26, 2010

Could it be? More little people?


Yeah, yeah, more of these. I've been too distracted by the Olympics to do much sewing.

This week's cooking post is up tomorrow. No knead pizza dough, yum!


Thursday, February 18, 2010

Week 7: Tofu in Black Bean Sauce


Ahhh, tofu. One of those foods I feel like I should like, but it's always so boring and underwhelming and, well, not chicken. But one of the things I want to do with this project is try new things, so why not take a stab at tofu?

This recipe is from the Moosewood Restaurant New Classics cookbook, slightly modified. The tofu was about as meh as I remembered, but the sauce was very tasty and I will certainly make it again. Probably to marinate chicken!

Start with a block of firm tofu (actually, I think this was extra firm). The first step in the recipe was to weight the tofu for 20 minutes, but I think because I used extra firm the weight didn't really seem to do anything. Cut the tofu first horizontally into 4 pieces, then cut from the top as shown, so you get 32 triangles.

The sauce: 2 tablespoons black bean and garlic sauce, 1/2 tsp chili paste, 1 tsp sesame oil, 4 tbsp soy sauce, 2 tbsp rice vinegar. Mix together, pour over the tofu and let it marinate for a while.

I could have used an additional tablespoon of the black bean sauce, in retrospect.


Heat some oil in a pan, and saute 3 garlic cloves, minced, and 1 tbsp fresh grated ginger just until fragrent, then add the tofu. Cook the tofu until golden brown (about 5 minutes), flip, and sear the other side. Keep the marinade, and while the tofu is cooking add to the marinade 1/3 cup of water, vegetable stock, or chicken stock, and 1 tablespoon of cornstarch. Whisk well.

Once the tofu is ready, dump in the marinade/stock/starch mixture and cook until it thickens into a nice sauce.

Serve over rice with steamed veggies on the side.


I really liked the sauce and will definitely make it again. Tastes very similar to a ready made PC sauce I used to buy. The tofu, eh. Still not a fan. The baby ate a few pieces; the older kid took the tiniest bite you've ever seen in your life then just ate the rice and the vegetables. Oh well, they can't all be winners!

Tofu in Black Bean Sauce

1 block firm or extra firm tofu
2 or 3 tablespoons black bean and garlic sauce
1/2 tsp chili paste
1 tsp sesame oil
4 tbsp soy sauce
2 tbsp rice vinegar
3 cloves garlic, minced
1 tablespoon fresh grated ginger
1/3 cup stock or water
1 tablespoon cornstarch

Cut block of tofu lengthwise into 4 slabs. With the slabs stacked, cut from corner to corner and then once lengthwise and once widthwise to create 32 triangles.

Mix together black bean sauce, chili paste, sesame oil, soy sauce, and vinegar. Pour over tofu and allow to marinate.

Heat some oil over medium, then saute garlic and ginger briefly. Add tofu in a single layer (reserve the marinade). Cook until golden brown (about 4 minutes), turn, and cook the other side.

Mix the marinade with stock and cornstarch, whisking well. Pour over the tofu and cook until the sauce thickens. Serve over rice with veggies on the side.

Monday, February 15, 2010

Valentine's Block

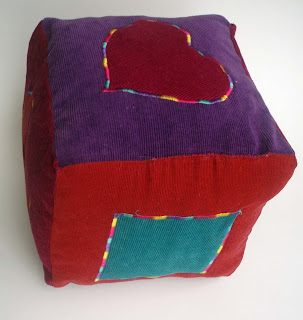
I did manage to make the baby a Valentine's present. Just a basic stuffed block with some shapes appliqued on the sides. It's cute!

Circle, heart, triangle.


Not fancy, but nice! I will probably make two more in smaller sizes (the sides measure about 7" on this, making it fairly large). It would be nice to have a set of three in different sizes for stacking. Add it to the to do list...

Saturday, February 13, 2010

New prototype: crayon and notepad case


I realized last night I didn't have any Valentine's presents for my kids, and what's the point of knowing how to sew if I can't whip something up at the last minute? Plus I've been meaning to make kid #1 a crayon case anyway. So I made this up for her.


Came out nicely! There's one flaw in it I will correct if/when I make more. My poor kids, always stuck with the flawed prototypes...

Exterior. you can see the error here; I didn't realize I need to do the line of stitching to make the pockets for the crayons shallower until I'd already sewn the whole thing together.


Pleased with it. I think the kiddo will like it, too. And I love the batiks in the interior, I need to see if I can get some more of those.

I also made the baby some simple stuffed hearts, but they honestly didn't turn out that well so I didn't bother taking pictures. Might head back to the sweatshop shortly to see if I can make something better for her...

Tuesday, February 9, 2010

Week 6: Chicken Crack


This tastes a lot better than it looks in the picture! Actually, it didn't exactly look the most appetizing in real life, either. Very beige. But tasty. Very, very tasty. I've seen the recipe pop up in a couple of places online, always referred to as 'Chicken Crack', with the idea being it's so good it's addictive like crack.

I wouldn't go quite that far. It's quite tasty, but also a little boring for my tastes. Basically it's chicken risotto. My kids enjoyed it, however, so the recipe makes it into the make again pile, although I think next time I'll probably, at the very least, include some mushrooms in my portion. And something green. Some sauteed mushrooms and zucchini mixed in to the adult servings would be delicious. Maybe a handful of peas for the kids. Or at least a bit of parsley on top to relieve the beigeness!

All the pictures of the process wound up very beige (beige beige beige did I mention beige?), so I won't inflict them on you. They really aren't that appealing. But the final result is pretty tasty!

The recipe for Chicken Crack:

4 boneless, skinless chicken breasts (2 is plenty)
3 tbsps. olive oil
1/2 tsp. salt
1/4 tsp. pepper
1 onion, finely chopped
2 cloves garlic, minced
1 1/2 cups uncooked long grain rice (doesn't have to be Arborio)
6 cups chicken broth (low sodium, or it might wind up too saltly)
1/2 cup parmesan cheese
1 tbsp. butter

Keep chicken broth warm and covered in a pot on the stove.

Cut chicken breasts into 1” pieces and sprinkle with salt and pepper. In a heavy deep pan, heat olive oil over medium-high heat. Add onion and garlic, and cook until tender. Add chicken and cook until it begins to brown. Add rice and stir to coat.

Add 1 cup chicken broth, reduce heat to low, and cook until liquid is absorbed, stirring frequently. Continue to add broth to keep rice covered, stirring frequently. Keep cooking and adding broth until rice is tender. Add cheese and butter just before serving.Served with broccoli and cheese sauce, just because there wasn't quite ENOUGH beige, apparently, that I had to dump more beige on top of the only green
:
Note: I used home made stock for this, which I think probably makes a big difference, if only to the salt content. Commercial stock would change the final taste quite a bit, I suspect. Also, this recipe requires a lot of attention, which isn't exactly ideal with a couple of little kids! Fortunately the baby was taking a nap when I started cooking, and didn't wake up until it was almost ready. I'm not sure I would have wanted to be making this with her underfoot.

Product Review: Poach Pods


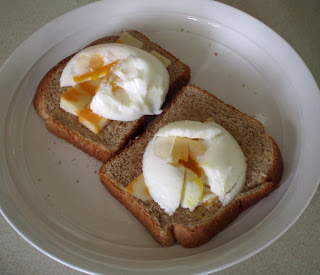
These are poach pods, which I bought from Lee Valley as a belated Christmas present to myself. I love poached eggs, and I love poached eggs for breakfast in particular (nothing else works quite as well as eggs in terms of being filling first thing in the morning!), and over the years I have tried many different ways of poaching eggs, and never really been satisfied with any of them. These looked like exactly the sort of thing I wanted - a way to easily and quickly poach eggs that, most importantly, would be easy to clean! After having used them for the last month, I can say these are the egg poaching solution I was looking forward. They're pretty much perfect.


You spray each pod lightly with something like PAM, or a bit of olive oil, or grease them in some way. You can get away without doing this, but the eggs will stick. A quick spray of oil and they come out much more easily. Crack an egg into each pod.


Set the pods in about an inch and a half of boiling water. The cover with a lid and let them cook until done. It takes a bit of trial and error to figure out the timing; I find 5 minutes gives me eggs poached the way I like them.
Finished! then you just lift out the pods, run a spoon around the edge of each egg to release them, and turn them out. Perfectly poached eggs every time.

(actually, I overcooked these ones slightly because I was messing around taking pictures - normally I prefer a runny yolk).

The poach pods clean up very easily, and can even go in the dishwasher.

I give the poach pods two thumbs up for sure. I'll probably buy another pair, actually, so I can make six eggs at once. My children love eggs, and very soon I suspect I'm going to find four eggs just isn't enough...

Wednesday, February 3, 2010

Week 5: The Ultimate Burrito


Ugh, the photos this week are just not good - a certain small child got fingerprints all over the camera lens, and I didn't realize every picture was sort of blurry and weird until it was too late.

At any rate, I have been on the search for the ultimate burrito, and I think I've created it. Actually, I've been craving a really awesome burrito for weeks, and this was the first time I got a chance to create one, and it came out just fantastic. My husband agreed, declaring it to be his favourite thing he's ever eaten. Now that's some high praise!

This involved a couple of new recipes, and some old favourites, all put together in one big wrapped up pile of awesome. The homemade flour tortilla. The long slow cooked pork shoulder. The red chile rice (the one part I'm not 100% happy with, I'm going to tweak that part the next time I make these). The burrito sauce. The salsa.

It is, as the kids would say, epic. I got every pot and pan I own dirty, plus the food processor and the stand mixer. It was a mess.

But so, so worth it.

Making your own flour tortillas takes a bit of time, but is fairly easy. The dough is 2 cups water, 2 tablespoons of lard, a pinch of salt, and about 3/4 cup of water. Knead together (I used my stand mixer) into a smooth dough, then let it rest at least a half an hour before you roll out the tortillas:


I have discovered that this very thin rolling pin is much, much easier to use than a standard rolling pin for rolling out tortillas and pitas and such things.

Seperate the dough into roughly 5 equally sized pieces, flatten each one slightly:

Roll out using short strokes, from the center out. I like to make the tortilla as thin as possible.


Fry it in a hot skillet or on a hot griddle for about 2 minutes per side. Wrap the finished tortillas in a clean tea towel - this will trap the heat/steam and keep them moist and pliable.

The major component of these burritos is the pork. I used a pork shoulder. Rub both sides with salt, pepper, and chili powder.

Cut slits in both sides and insert peeled cloves of garlic. I used six of them, because garlic rocks.


Fry up some onions until soft, then stir in a cup of salsa verde and cook for about two minutes. Dump into a crock pot. Then sear the pork on both sides until nicely browned, and add that to the crockpot. DON'T add any more liquid. Cover and put the crockpot on high for about 4 hours or low for about 8.


You know it's done when just touching it with a fork causes it to start to disintegrate! Once that happens, shred the pork and then cook for about another 30 minutes with the lid off to evaporate some of the liquid. Unfortunately, none of my photos of the finished meat is worth sharing. they don't do the flavour justice anyway. Mind blowing. Seriously. Use to fill tacos, burritos, or just toss on some rice and eat as is.

The rice for this burrito is a Rick Bayless Recipe from Mexican Kitchen. It's the one component I'm not happy with; I'll type up the recipe tomorrow and append it to this post, along with the ways I think I screwed it up (namely, using the wrong dried chiles!). The overall burrito was still amazing because frankly the other parts totally overwhelmed the flavour of the rice!

Also included are my burrito sauce (1/3 cup mayo, 2/3 cups sour cream, 2 tbsp salsa verde, and a dash of hot sauce) and some fresh salsa (diced tomato, onion, cilantro, garlic, salt). Both of these should be made ahead of time so the flavours can develop. Add some cheese, and you are ready to eat!

It's also especially good if you can wrap up the burrito and then grill it before you eat it to crisp up the tortilla a bit and meld things together.

Yet more Little People


Not much doing, creativity wise. Working my whole two days a weeks is a lot more draining than working only one day a week (I know, cry me a river)! And my shop is so dead right now there might as well be tumbleweeds blowing across the screen.

But, in the interests of being prepared in case of some sort of Easter rush, I've made up a few more of these little people sets. Next up, I want to get a half dozen or so pencil crayon and notepads cases done too.


These will be up in the store in the next day or two.